
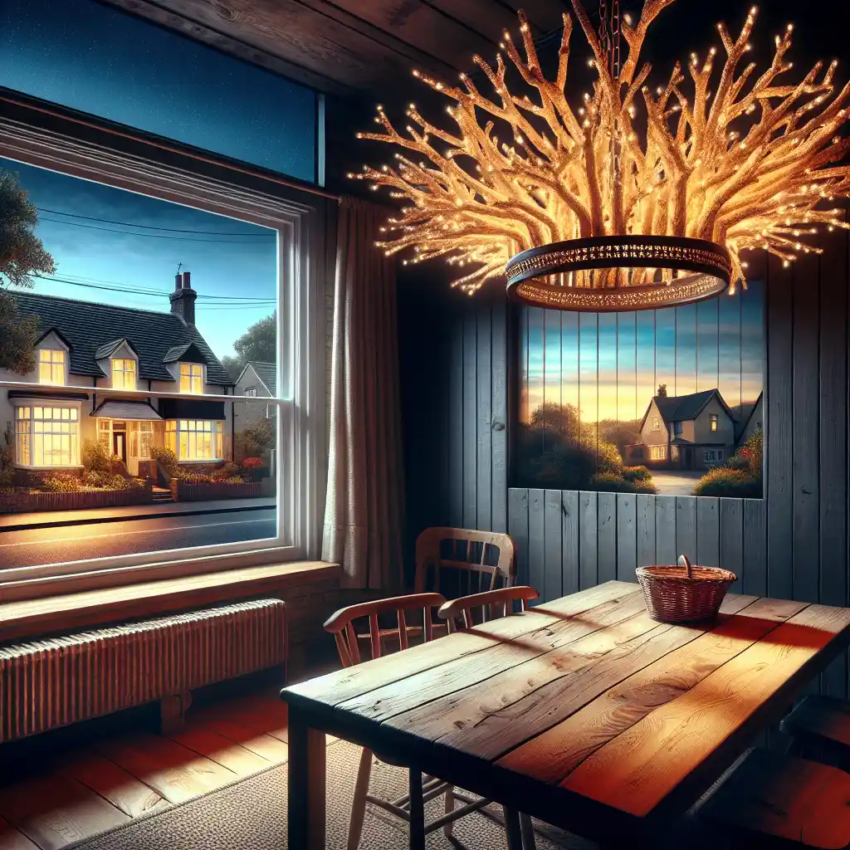
A DIY tree branch chandelier is a homemade light fixture made from natural tree branches, creating a rustic, nature-inspired look for your home. The process involves gathering and assembling tree branches, adding light fixtures and decorations, and hanging the chandelier from the ceiling.
Creating a DIY tree branch chandelier involves steps such as wrapping branches with lights, installing hooks in the ceiling, hanging the branches, running an extension cord, covering the cord, trimming the branches, and decorating the chandelier to fit your desired aesthetic.
Check out this Youtube video: DIY Tree Branch Chandelier Tutorial by AspenAckley for a creative and unique approach to lighting up your space with a natural and rustic touch.
Materials
List of materials needed to create a DIY tree branch chandelier
To create a DIY tree branch chandelier, you will need a set of materials to bring your creative vision to life. Here’s a comprehensive list of the materials you require:
-
Tree Branches (6 apple or cherry tree branches, 18 to 24 inches long)
-
Clear spray lacquer
-
White fabric cable
-
Bulbs (vintage-style LED filament light bulbs)
-
Porcelain bulb holders
-
Florist’s wire
-
Wire cutters
-
Ceiling rose
-
Crystal glass flowers (optional for embellishment)
-
Lights (Christmas lights or LED light strings)
Creating a striking tree branch chandelier involves careful selection and preparation of the right materials to ensure a breathtaking final outcome.
Step-by-Step Guide
The step-by-step guide for creating a DIY tree branch chandelier involves a meticulous process to bring your vision to reality. Here’s a comprehensive guide detailing each step:
- Select Tree Branches: Choose 6 apple or cherry tree branches, each 18 to 24 inches long.
-
Lacquer the Branches: Apply clear spray lacquer to the branches to enhance their durability and preserve their natural beauty.
-
Attach Bulb Holders: Use florist’s wire to secure porcelain bulb holders onto the branches at desired intervals.
-
Wire and Bulb Installation: Carefully thread white fabric cable through the branches and connect the vintage-style LED filament light bulbs to the porcelain bulb holders.
-
Secure Ceiling Hooks: Install sturdy hooks in the ceiling to support the weight of the chandelier.
-
Hang the Branch: Gently suspend the prepared tree branches from the installed ceiling hooks, ensuring a balanced and aesthetically pleasing arrangement.
-
Extension Cord Placement: Run the extension cord from a power source to the chandelier location, discreetly trailing it along the ceiling and walls.
-
Conceal Extension Cord: Conceal the extension cord using methods such as cord covers or creative placement to seamlessly integrate it with the chandelier’s design.
-
Trim Excess Branches: Trim any excess length from the branches to achieve the desired shape and symmetry for the chandelier.
-
Embark on Decorating: Add embellishments such as crystal glass flowers or additional lights to personalize and enhance the visual appeal of your tree branch chandelier.
The DIY process requires attention to detail and creativity, culminating in a visually captivating and unique home decor piece.

Step-by-Step Guide
Understanding the DIY Tree Branch Chandelier Project
To embark on your DIY tree branch chandelier project, begin by gathering the necessary materials and tools including tree branches, strong wire, LED lights, hanging hooks, and a power drill. It’s essential to ensure that the tree branches are of varying lengths to add an organic and appealing aesthetic to the chandelier.
Identifying the Ideal Tree Branches
Carefully source your tree branches ensuring they are sturdy and safe. You may select different tree branches to create a diverse and visually appealing arrangement for your chandelier.
Additionally, make sure to check for any signs of damage or decay, and always obtain permission before cutting branches from public or private property.
Preparing the Tree Branches
Before assembling the chandelier, it’s pivotal to prepare the tree branches by cleaning and sanding them. A thorough cleaning will remove any dirt or debris, and sanding will smoothen the branches for a polished and aesthetically pleasing finish.
Assembling the Tree Branch Chandelier
Next, assemble the tree branches in your desired formation, ensuring they are securely connected using strong wire. It’s important to take your time during this step to ensure stability and durability.
Once assembled, it’s wise to also integrate LED lights within the branches for a captivating illumination effect.
Installation and Safety Precautions
Before you proceed with installation, identify a suitable location for the chandelier and ensure it’s compatible with the weight and dimensions of the fixture. Installation should be carried out meticulously, ensuring that the chandelier is firmly and safely attached to the ceiling.
Moreover, consider integrating a dimmer switch for adjustable lighting and always follow safety protocols when working with electrical components.
Adding Personal Touches and Customization
To infuse your unique style into the chandelier, consider adding personalized embellishments or decorative elements. This customization allows you to tailor the chandelier to complement your existing interior decor, creating a truly bespoke and eye-catching piece.
Final Touches and Maintenance
As the finishing touch, carefully inspect the chandelier to ensure it is securely installed and aesthetically pleasing. Additionally, establish a regular maintenance schedule to guarantee the chandelier remains in optimal condition, conducting thorough checks on the electrical components and cleaning the fixture as needed.
Showcasing Your DIY Creation
Once your DIY tree branch chandelier is completed, take the opportunity to proudly display your creation. Share images and your personal experience on social media platforms or within a blog to inspire and engage with other DIY enthusiasts, showcasing the stunning end result of your inventive project.
Undertaking a DIY tree branch chandelier project is a rewarding endeavor that allows for the expression of creativity and craftsmanship. By following the detailed step-by-step guide and infusing personalized touches, you can create an exquisite and captivating piece that enhances the ambiance of your living space.

Materials and Tools Required for DIY Tree Branch Chandelier
| Materials | Tools |
|---|---|
| Tree Branches | Power Drill |
| Strong Wire | Sandpaper |
| LED Lights | Hanging Hooks |